Officially, the High Sierra supports a considerable technological leap, boasting vast space savings in video and pictures, better face recognition, VR compatibility, etc. The Mac’s latest upgrade is purported by Apple to be the “latest technology” and although it seems promising, users choices should be respected.
Apple’s tenacity has led to users experiencing annoying notifications, leading to various inquiries about “how to turn off Mac OS High Sierra notification”.
1. Reasons why People Pass on MacOS 10.13 High Sierra
The sheer fact that Apple thought it unwise to give their users the benefit of choice by providing a “Never” or “Not Now” button, only gets users irate. Newbie Mac users might find it difficult to silence this notification as its functioning supersedes even the Systems Preferences > Notifications tweaking.
This “how to turn off Mac OS High Sierra notification” problem has become so widespread as it has been programmed to be pushed to all Macs with OS versions prior to the High Sierra, which is literally the majority of Mac users.
For some users with an aversion to change (not early adopters of technology upgrades., this High Sierra Notification can be irritating. For others that possess a Hackintosh, upgrading is never a good idea until hacks for the new OS have been confirmed. Moreover, for some others, because they have non-Apple supported GPUs, the “how to turn off Mac OS High Sierra notification” inquiry is important.
2. How to Permanantly Turn off High Sierra Update Notification on Mac?
The High Sierra OS download was structured in such an effective way that it downloads in the background without notice to users, thus eliminating the first-degree choice. Hereafter, it pops up only to notify you to install the already downloaded OS, which in Apple’s logic would be a no-brainer when coupled with the absence of a silencing option on the popup.
Your best bet would be to open the installer then close the install window, till the popup comes up again, thus repeating the cycle. Also, you can try putting your Mac on DND mode, but this unconventional popup would come through unscathed. Additionally, hiding update on the High Sierra update in the App Store might not be effective at stopping the popup. Only the below-listed options have been proven to turn off Mac OS High Sierra notification.
Method 1: Use Terminal Command
Using terminal commands on your Mac should always be preceded by executing a system back-up. After a successful system backup, follow the steps below:
1. Use Spotlight to launch the Terminal App that can be found in the Applications/ Utilities folder.
2. In the terminal window, type or paste the following command, followed by tapping the Enter key: sudo mv /Library/Bundles/OSXNotification.bundle ~/Documents/.
Given the security sensitive nature of this hack, you might be required to provide administrative clearance by inputting your Mac account password.
3. Restart your Mac conventionally. Upon reboot, your Mac would block all notifications, including the High Sierra Notification.
In a situation where you want to reinstate your Mac’s notification setting, access the terminal window as described above and input the following command: sudo mv ~/Documents/OSXNotification.bundle /Library/Bundles/. Restart your Mac once again to induce the change and enjoy the notifications.
In theory, this “OSXNotification.bundle” is the package responsible for OS upgrade notification and this method transfers it from its initial location in /Library/Bundles/ to your user Mac’s default Documents.

Sadly, in some weird instances, this method might give an error message during execution, so the below method highlights the alternative approach.
Method 2: Alternative Way when Terminal Command Does not Work
Whether it is due to administrative privilege issues with your Mac account or some other technical glitches, certain users might have to manually move the “OSXNotification.bundle” from its original location to their preferred folder. To do this, follow the steps below:
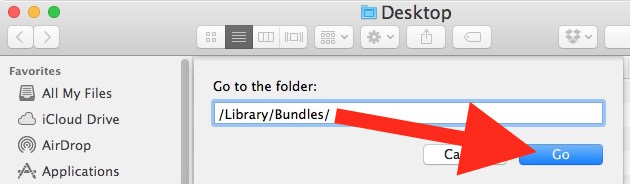
1. Open the Finder app on your device.
2. in the Finder’s Go option, select the Go To Folder option.
3. Paste the “/Library/Bundles/” path and click the Go tab.
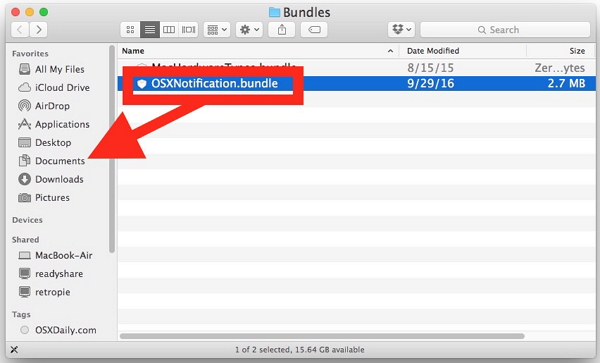
4. Once in the folder, identify and move the file “OSXNotification.bundle” from that folder to your preferred folder. Click and hold the Command (⌘. tab on your keyboard while moving the file to its new destination. Be careful not to delete this file as it is a highly important document for whenever you choose to reinstall your upgrade notifications. Moreover, it is important you place the document in an easily accessible folder such as “Documents” so you do not experience frustration when trying to locate it. Sponsor ads:
Gihosoft Free iPhone Data Recovery:https://www.gihosoft.com/iphone-data-recovery-free.html
Gihosoft iPhone Data Recovery Free
Free iPhone Data Recovery Software for Windows/Mac
Recover up to 12+ types of files, including contacts, SMS, photos, WhatsApp, Viber, notes, etc.
Restore lost data from iOS devices directly or from iTunes and iCloud backup
Recover iPhone data lost due to iOS upgrade/jailbreak, accidental deletion, device lost or broken
Support all the latest iPhone, iPad and iPod Touch
Both Free and Pro version.
If you lost data after you updated to a new iPhone, you can always use Gihosoft iPhone Data Recovery to get the data back from the old iPhone or backup.You may also like: iphonerecovery.com
If you use android phones, please choose Gihosoft Android Data Recovery.
With Gihosoft Android Data Recovery, no longer afraid of data loss!
Must read:Youtube video downloader for pc
Gihosoft RePicvid Free Photo Recovery Software provides a free photo recovery software for windows to help users recover the deleted or lost photo for free.
Jihosoft Android Data Recovery: the best Android Data Recovery software for Windows and Mac to recover deleted contacts, messages, photos, videos, WhatsApp and etc from Android devices.Tips:How to transfer messages from iPhone to iPhone
jihosoft Free iPhone Data Recovery
5. Restart your Mac conventionally to activate the change.
It would be advised that users turn on their install system data files and security updates in.
System Preferences > App Store to provide ample security from zero-day exploitation.
Part 3: How to Update Mac to MacOS High Sierra Anyway?
There exist various reasons to support an upgrade to High Sierra and some of these are:
1. Space Saving Videos: Apple has upgraded their HEVC from H.264 to H.265, thus allowing 40% better compression while maintaining quality.
2. Smarter Photos: Improved face recognition, syncing and interesting partnerships with new print companies, an introduction of Curves which allows for precise coloring and editing, Selective Colours even allows for cloth changing.
3. Split Mails: Full-screen Split View mail allows users compose mail while accessing the entire mailbox.
4. Data Transfer: The introduction of the Apple File System to the High Sierra allowing for unprecedented data transfer speed.
How to Update MacOS High Sierra
Should you finally choose to upgrade to the macOS 10.13 High Sierra, it is needful you perform the following:
1. Ascertain your Macs health by Clicking the First Aid button in the Disk Utility.
2. Repair any damage using the Repair Disk.
3. Backup your Mac to a trusted drive.
4. Upgrade!
For more information regarding executing the update, read the article How to Upgrade Your Mac to MacOS 10.13 High Sierra. https://macpaw.com/how-to/how-to-upgrade-your-mac-to-macos-10-13-high-sierra.
In summary, various users should be entitled to their preferences; whether to upgrade or not. Although Apple tried to influence this decision, this article how to turn off Mac OS High Sierra notification provides educative information to inform users' decision whether or not to upgrade to the High Sierra.


No comments:
Post a Comment